Initial setup
Create your first tenant and configure authentication on it.
Set up tenant-specific authentication and enterprise providers.
Set up SuperTokens multi-tenancy for this application. Inspect the existing backend, frontend, authentication recipes, and tenant identification strategy. Determine whether the feature requires the managed service, configure tenant creation and enabled first factors, and add enterprise provider configuration with credentials stored in environment variables. Preserve existing conventions, avoid committing secrets, and validate tenant resolution, provider callbacks, login, and session behavior for more than one tenant.
Before you start
Steps
1. Create a tenant
The first step in setting up a multi tenant login system is to create a tenant in the SuperTokens core.
Each tenant has a unique tenantId mapped to that tenant’s configuation.
The tenantId could be that tenant’s sub domain, or a workspace URL, or anything else that can help identify them.
The configuration mapped to each tenant contains information about which login methods they enable.
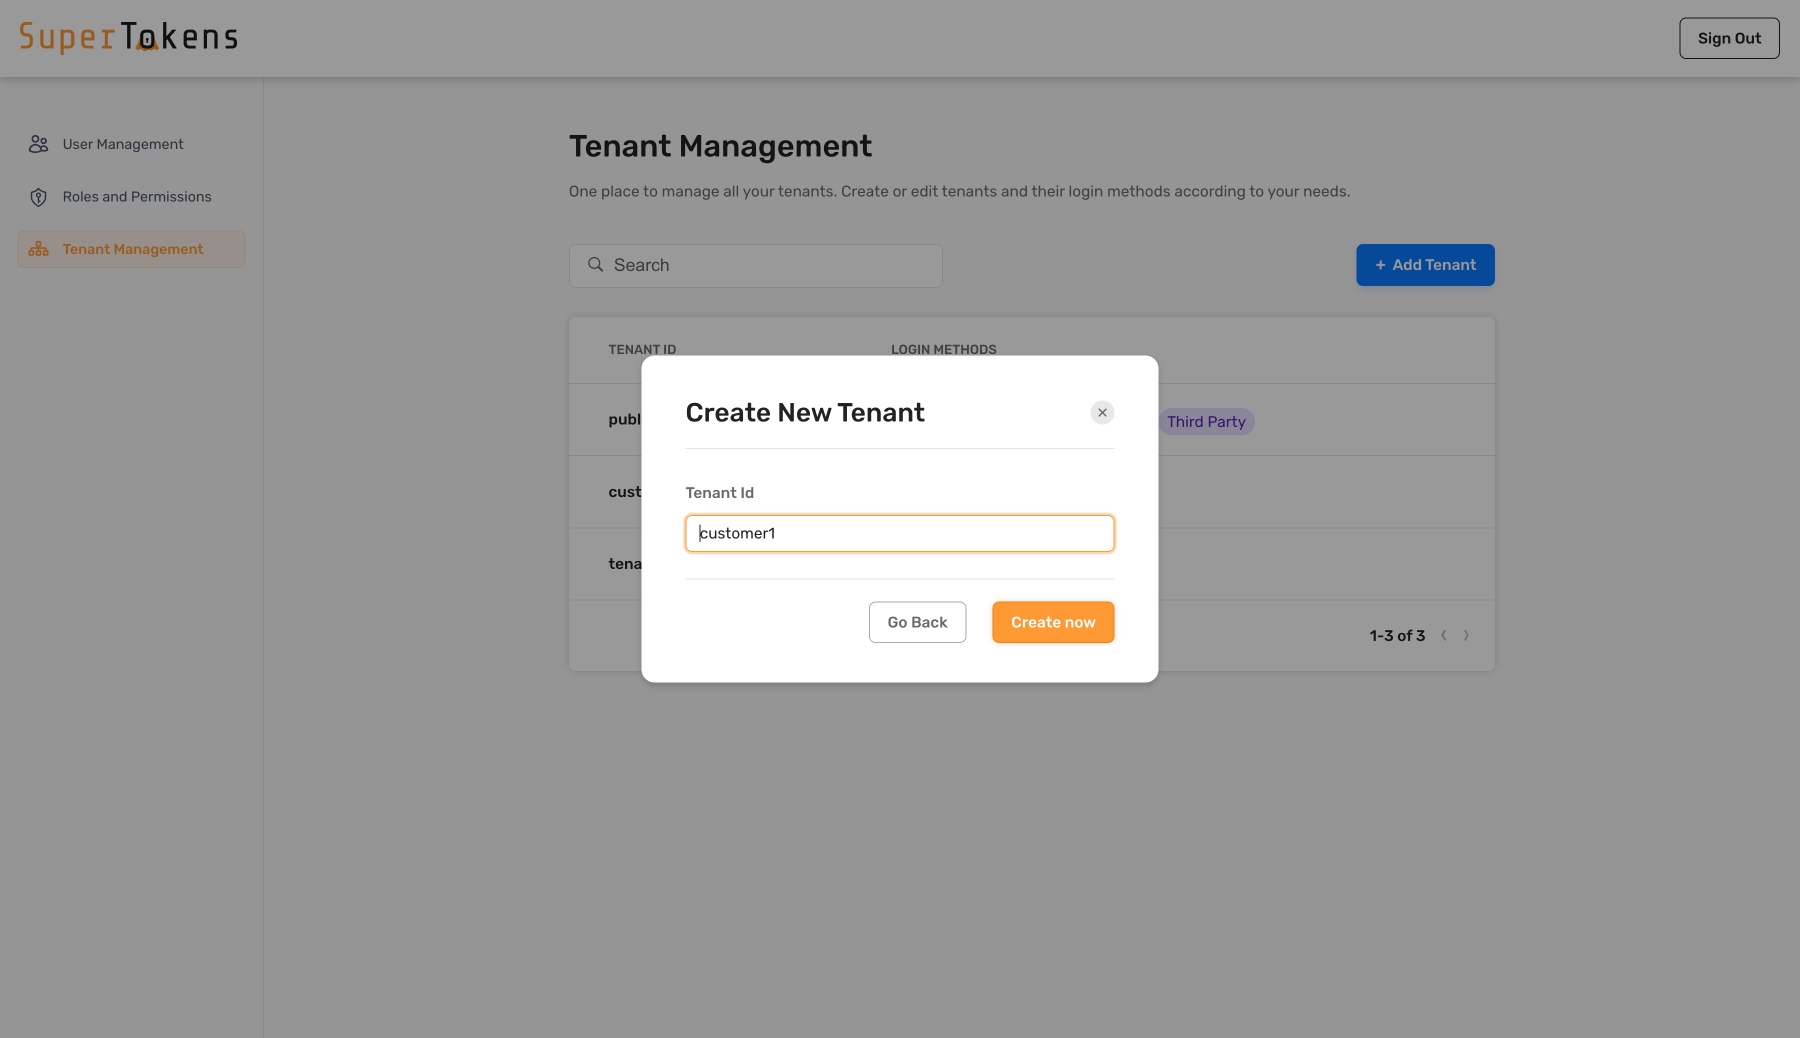
Create a new tenant by clicking on the Add Tenant button and specify the tenant ID.
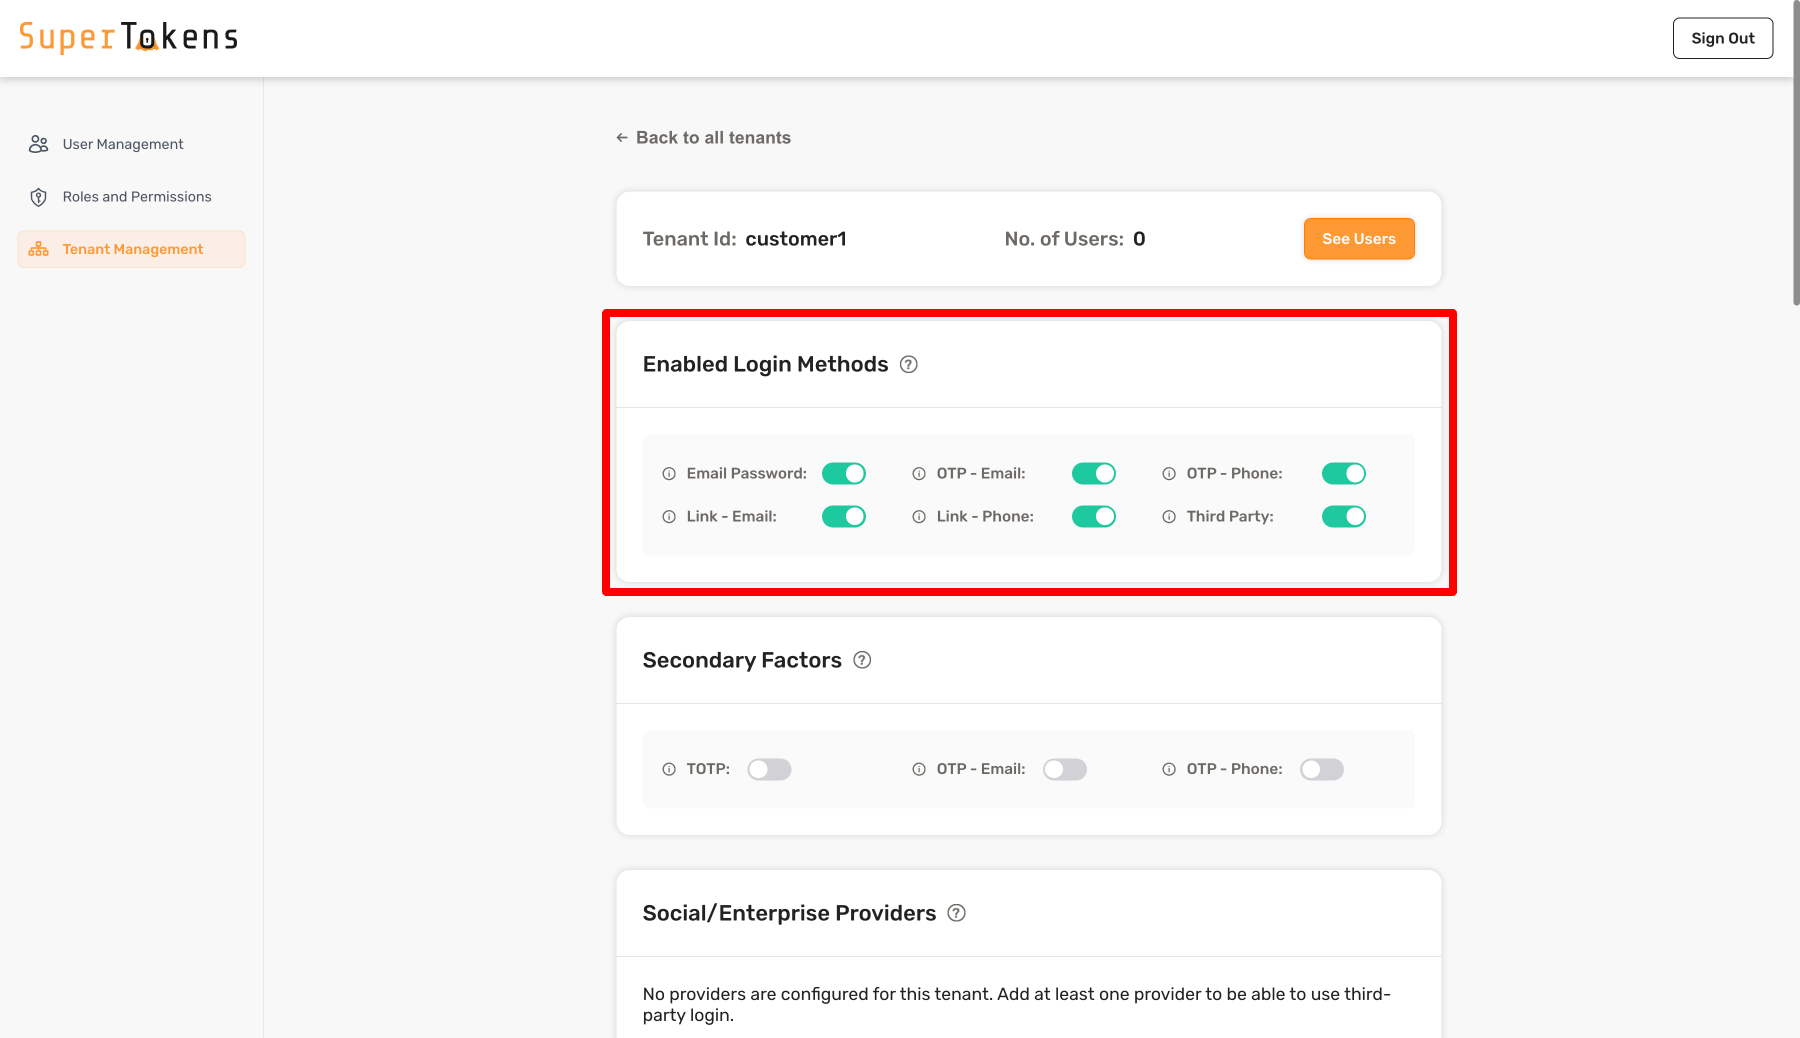
Once you create the tenant, turn on the Login Methods as required for the tenant. In the above example, you turn on all the Login Methods.
import Multitenancy from "supertokens-node/recipe/multitenancy";

async function createNewTenant() {
  let resp = await Multitenancy.createOrUpdateTenant("customer1", {
    firstFactors: ["emailpassword", "thirdparty", "otp-email", "otp-phone", "link-phone", "link-email"],
  });

  if (resp.createdNew) {
    // Tenant created successfully
  } else {
    // Existing tenant's config was modified.
  }
}
import (
"github.com/supertokens/supertokens-golang/recipe/multitenancy"
"github.com/supertokens/supertokens-golang/recipe/multitenancy/multitenancymodels"
)
func main() {
tenantId := "customer1"
emailPasswordEnabled := true
thirdPartyEnabled := true
passwordlessEnabled := true
resp, err := multitenancy.CreateOrUpdateTenant(tenantId, multitenancymodels.TenantConfig{
EmailPasswordEnabled: &emailPasswordEnabled,
ThirdPartyEnabled: &thirdPartyEnabled,
PasswordlessEnabled: &passwordlessEnabled,
})
if err != nil {
// handle error
}
if resp.OK.CreatedNew {
// new tenant was created
} else {
// existing tenant's config was modified.
}
}from supertokens_python.recipe.multitenancy.asyncio import create_or_update_tenant
from supertokens_python.recipe.multitenancy.interfaces import TenantConfigCreateOrUpdate
async def some_func():
response = await create_or_update_tenant("customer1", TenantConfigCreateOrUpdate(
first_factors=["emailpassword", "thirdparty", "otp-email", "otp-phone", "link-phone", "link-email"]
))
if response.status != "OK":
print("Handle error")
elif response.created_new:
print("New tenant was created")
else:
print("Existing tenant's config was updated")from supertokens_python.recipe.multitenancy.syncio import create_or_update_tenant
from supertokens_python.recipe.multitenancy.interfaces import TenantConfigCreateOrUpdate
def some_func():
response = create_or_update_tenant("customer1", TenantConfigCreateOrUpdate(
first_factors=["emailpassword", "thirdparty", "otp-email", "otp-phone", "link-phone", "link-email"]
))
if response.status != "OK":
print("Handle error")
elif response.created_new:
print("New tenant was created")
else:
print("Existing tenant's config was updated")curl --location --request PUT 'http://localhost:3567/recipe/multitenancy/tenant/v2' \
--header 'api-key: YOUR_API_KEY' \
--header 'Content-Type: application/json' \
--data-raw '{
"tenantId": "customer1",
"firstFactors": ["emailpassword", "thirdparty", "otp-email", "otp-phone", "link-email", "link-phone"]
}'The snippet creates a new tenant with the id "customer1".
It enables the email password, third party and passwordless login methods for this tenant.
You can also disable any of these by not including them in the firstFactors input.
If firstFactors is not specified, by default, the system does not enable any of the login methods.
If you set firstFactors to null the SDK uses any of the login methods.
The built-in Factor IDs available for firstFactors include:
| Authentication Type | Factor ID |
|---|---|
| Email password auth | emailpassword |
| Social login / enterprise SSO auth | thirdparty |
| Passwordless - Email OTP | otp-email |
| Passwordless - SMS OTP | otp-phone |
| Passwordless - Email magic link | link-email |
| Passwordless - SMS magic link | link-phone |
The code snippet creates a new tenant with the id "customer1".
It enables the email password, third party and passwordless login methods for this tenant.
You can also disable any of these by setting the corresponding field to false.
The code snippet creates a new tenant with the id "customer1".
It enables the email password, third party and passwordless login methods for this tenant.
You can also disable any of these by setting the corresponding field to false.
The request includes the appId for which you need to create a new tenant.
If you are using the default ("public") app, you can omit the /appid-<APP_ID> part of the URL.
The snippet creates a new tenant with the id "customer1".
It enables the email password, third party and passwordless login methods for this tenant.
You can also disable any of these by not including them in the firstFactors input.
If firstFactors is not specified, by default, the system does not enable any of the login methods.
The built-in Factor IDs available for firstFactors include:
| Authentication Type | Factor ID |
|---|---|
| Email password auth | emailpassword |
| Social login / enterprise SSO auth | thirdparty |
| Passwordless - Email OTP | otp-email |
| Passwordless - SMS OTP | otp-phone |
| Passwordless - Email magic link | link-email |
| Passwordless - SMS magic link | link-phone |
Configure third party providers
If you are using the thirdparty recipe on a tenant, you also need to set the providers that you want to use with it.
There’s an extensive list of built-in providers, but you can also configure a custom provider.
The next code snippet shows how you can add an Active Directory login to your tenant.
Update the clientId, clientSecret, and directoryId based on your tenant configuration.
import Multitenancy from "supertokens-node/recipe/multitenancy";

async function addThirdPartyToTenant() {
  let resp = await Multitenancy.createOrUpdateThirdPartyConfig("customer1", {
    thirdPartyId: "active-directory",
    name: "Active Directory",
    clients: [
      {
        clientId: "...",
        clientSecret: "...",
      },
    ],
    oidcDiscoveryEndpoint: "https://login.microsoftonline.com/<directoryId>/v2.0/.well-known/openid-configuration",
  });

  if (resp.createdNew) {
    // Provider added to customer1
  } else {
    // Existing provider config overwritten for customer1
  }
}
import (
"github.com/supertokens/supertokens-golang/recipe/multitenancy"
"github.com/supertokens/supertokens-golang/recipe/thirdparty/tpmodels"
)
func main() {
tenantId := "customer1"
resp, err := multitenancy.CreateOrUpdateThirdPartyConfig(tenantId, tpmodels.ProviderConfig{
ThirdPartyId: "active-directory",
Name: "Active Directory",
Clients: []tpmodels.ProviderClientConfig{
{
ClientID: "...",
ClientSecret: "...",
},
},
OIDCDiscoveryEndpoint: "https://login.microsoftonline.com/<directoryId>/v2.0/.well-known/openid-configuration",
}, nil)
if err != nil {
// handle error
}
if resp.OK.CreatedNew {
// Provider added to customer1
} else {
// Existing provider config overwritten for customer1
}
}from supertokens_python.recipe.multitenancy.asyncio import create_or_update_third_party_config
from supertokens_python.recipe.thirdparty.provider import ProviderConfig, ProviderClientConfig
async def some_func():
tenant_id = "customer1"
result = await create_or_update_third_party_config(tenant_id, ProviderConfig(
third_party_id="active-directory",
name="Active Directoy",
clients=[
ProviderClientConfig(
client_id="...",
client_secret="...",
),
],
oidc_discovery_endpoint="https://login.microsoftonline.com/<directoryId>/v2.0/.well-known/openid-configuration",
))
if result.status != "OK":
print("handle error")
elif result.created_new:
print("Provider added to customer1")
else:
print("Existing provider config overwritten for customer1")2. Provide additional configuration per tenant
You can also configure a tenant to use different settings. The next sample shows you how to customize the values.
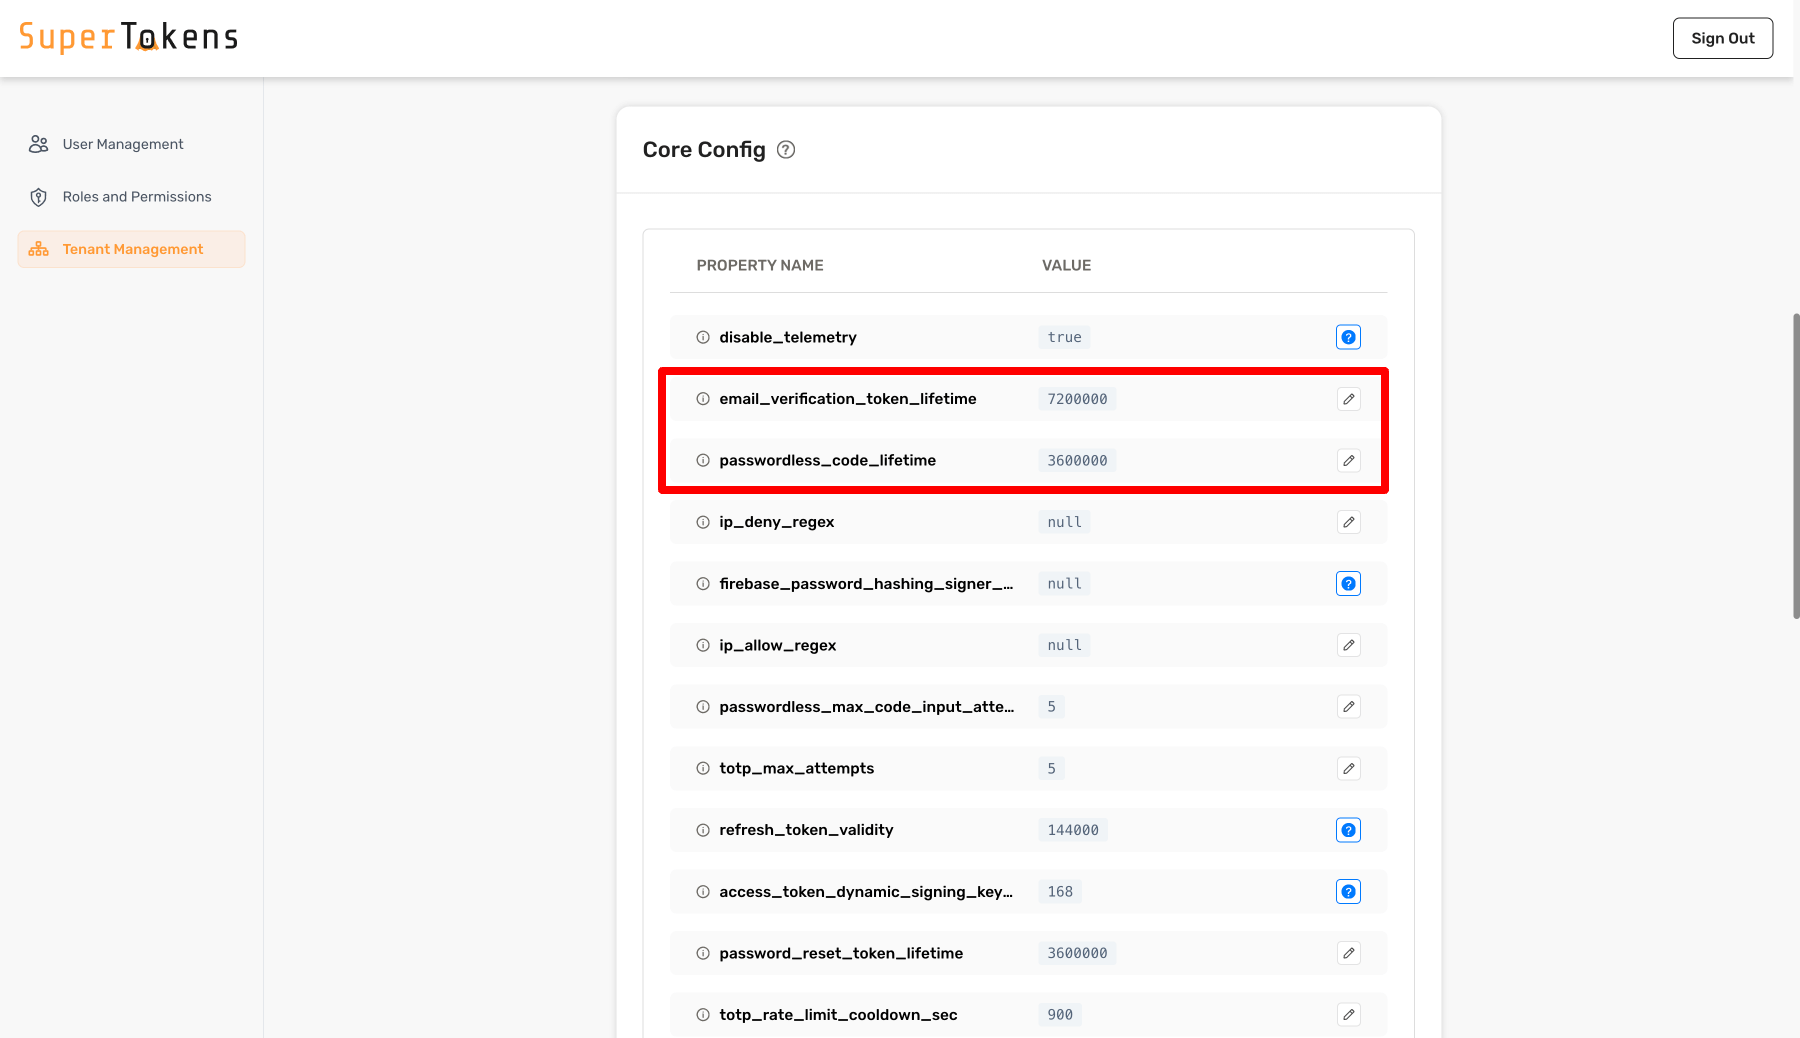
In the above example, the system assigns different values for certain configurations for customer1 tenant.
All other configurations inherit from the base configuration.
You can edit the values by clicking on the pencil icon and then specifying a new value.
import Multitenancy from "supertokens-node/recipe/multitenancy";

async function createNewTenant() {
  let resp = await Multitenancy.createOrUpdateTenant("customer1", {
    coreConfig: {
      email_verification_token_lifetime: 7200000,
      password_reset_token_lifetime: 3600000,
      postgresql_connection_uri: "postgresql://localhost:5432/db2",
    },
  });

  if (resp.createdNew) {
    // new tenant was created
  } else {
    // existing tenant's config was modified.
  }
}
import (
"github.com/supertokens/supertokens-golang/recipe/multitenancy"
"github.com/supertokens/supertokens-golang/recipe/multitenancy/multitenancymodels"
)
func main() {
tenantId := "customer1"
resp, err := multitenancy.CreateOrUpdateTenant(tenantId, multitenancymodels.TenantConfig{
CoreConfig: map[string]interface{}{
"email_verification_token_lifetime": 7200000,
"password_reset_token_lifetime": 3600000,
"postgresql_connection_uri": "postgresql://localhost:5432/db2",
},
})
if err != nil {
// handle error
}
if resp.OK.CreatedNew {
// new tenant was created
} else {
// existing tenant's config was modified.
}
}from supertokens_python.recipe.multitenancy.asyncio import create_or_update_tenant
from supertokens_python.recipe.multitenancy.interfaces import TenantConfigCreateOrUpdate
async def some_func():
tenant_id = "customer1"
result = await create_or_update_tenant(tenant_id, TenantConfigCreateOrUpdate(
core_config={
"email_verification_token_lifetime": 7200000,
"password_reset_token_lifetime": 3600000,
"postgresql_connection_uri": "postgresql://localhost:5432/db2",
},
))
if result.status != "OK":
print("handle error")
elif result.created_new:
print("new tenant created")
else:
print("existing tenant's config was modified.")from supertokens_python.recipe.multitenancy.syncio import create_or_update_tenant
from supertokens_python.recipe.multitenancy.interfaces import TenantConfigCreateOrUpdate
tenant_id = "customer1"
result = create_or_update_tenant(tenant_id, TenantConfigCreateOrUpdate(
core_config={
"email_verification_token_lifetime": 7200000,
"password_reset_token_lifetime": 3600000,
"postgresql_connection_uri": "postgresql://localhost:5432/db2",
},
))
if result.status != "OK":
print("handle error")
elif result.created_new:
print("new tenant created")
else:
print("existing tenant's config was modified.")curl --location --request PUT 'http://localhost:3567/recipe/multitenancy/tenant/v2' \
--header 'api-key: YOUR_API_KEY' \
--header 'Content-Type: application/json' \
--data-raw '{
"tenantId": "customer1",
"coreConfig": {
"email_verification_token_lifetime": 7200000,
"password_reset_token_lifetime": 3600000,
"postgresql_connection_uri": "postgresql://localhost:5432/db2"
}
}'In the above example, the system assigns different values for certain configurations for customer1 tenant.
All other configurations inherit from the base configuration.
Notice the postgresql_connection_uri.
This allows you to achieve data isolation on a tenant level.
This configuration is not required.
If not provided, the database stores the tenant’s information as specified in the core’s configuration.
It is still a different user pool though.
In the above example, the system assigns different values for certain configurations for customer1 tenant.
All other configurations inherit from the base configuration.
Notice the postgresql_connection_uri.
This allows you to achieve data isolation on a tenant level.
This configuration is not required.
If not provided, the database stores the tenant’s information as specified in the core’s configuration.
It is still a different user pool though.
In the above example, the system assigns different values for certain configurations for customer1 tenant.
All other configurations inherit from the base configuration.
Notice the postgresql_connection_uri.
This allows you to achieve data isolation on a tenant level.
This configuration is not required.
If not provided, the database stores the tenant’s information as specified in the core’s configuration.
It is still a different user pool though.
In the above example, the system assigns different values for certain configurations for customer1 tenant.
All other configurations inherit from the base configuration.
Notice the postgresql_connection_uri.
This allows you to achieve data isolation on a tenant level.
This configuration is not required.
If not provided, the database stores the tenant’s information as specified in the core’s configuration.
It is still a different user pool though.
3. View tenant details
To view the configuration for a specific tenant you can use an SDK method or call the API directly.
import Multitenancy from "supertokens-node/recipe/multitenancy";

async function getTenant(tenantId: string) {
  let resp = await Multitenancy.getTenant(tenantId);

  if (resp === undefined) {
    // tenant does not exist
  } else {
    let coreConfig = resp.coreConfig;

    let firstFactors = resp.firstFactors;

    let configuredThirdPartyProviders = resp.thirdParty.providers;
  }
}
import (
"fmt"
"github.com/supertokens/supertokens-golang/recipe/multitenancy"
)
func main() {
tenantId := "customer1"
tenant, err := multitenancy.GetTenant(tenantId)
if err != nil {
// handle error
}
if tenant == nil {
// tenant does not exist
} else {
isEmailPasswordLoginEnabled := tenant.EmailPassword.Enabled;
isThirdPartyLoginEnabled := tenant.ThirdParty.Enabled;
isPasswordlessLoginEnabled := tenant.Passwordless.Enabled;
if (isEmailPasswordLoginEnabled) {
// Tenant support email password login
}
if (isThirdPartyLoginEnabled) {
// Tenant support third party login
configuredThirdPartyProviders := tenant.ThirdParty.Providers;
fmt.Println(configuredThirdPartyProviders);
}
if (isPasswordlessLoginEnabled) {
// Tenant support passwordless login
}
}
}from supertokens_python.recipe.multitenancy.asyncio import get_tenant
async def some_func():
tenant = await get_tenant("customer1")
if tenant is None:
print("tenant does not exist")
else:
core_config = tenant.core_config
first_factors = tenant.first_factors
providers = tenant.third_party_providers
print(core_config)
print(first_factors)
print(providers)from supertokens_python.recipe.multitenancy.syncio import get_tenant
tenant = get_tenant("customer1")
if tenant is None:
print("tenant does not exist")
else:
core_config = tenant.core_config
first_factors = tenant.first_factors
providers = tenant.third_party_providers
print(core_config)
print(first_factors)
print(providers)curl --location --request GET 'http://localhost:3567/customer1/recipe/multitenancy/tenant/v2' \
--header 'api-key: YOUR_API_KEY' \
--header 'Content-Type: application/json'Notice that you add customer1 to the path of the request. This tells the core that the tenant you want to get the information about is customer1 (the one created before in this page).
If the input tenant does not exist, you get back a 200 status code with the following JSON:
{ "status": "TENANT_NOT_FOUND_ERROR" }Otherwise you get a 200 status code with the following JSON output:
{
  "status": "OK",
  "thirdParty": {
    "providers": [...]
  },
  "coreConfig": {
	"email_verification_token_lifetime": 7200000,
	"password_reset_token_lifetime": 3600000,
	"postgresql_connection_uri": "postgresql://localhost:5432/db2"
  },
  "tenantId": "customer1",
  "firstFactors": ["emailpassword", "thirdparty", "otp-email", "otp-phone", "link-email", "link-phone"]
}
The returned coreConfig is the same as what you set when creating / updating the tenant. The rest of the core configurations for this tenant inherit from the app’s (or the public tenant) configuration. The public tenant, for the public app inherits its configurations from the config.yaml / docker environment variables values.
4. Set up the user interface
To allow users to authenticate using one of your previously created tenants you need to update your frontend application. You can do this in two ways: through a common domain, through subdomains.
Explore the two guides for a full list of instructions on how to implement the flows.